

Did you know that up to 45 percent of UK households report pest problems each year? Left unchecked, pests can seriously threaten both your health and your home’s value. When pest professionals finish their work, knowing exactly how and when to clean is just as vital as the treatment itself. The right steps not only protect your family but also prevent a fast return of unwanted guests, giving you peace of mind and a truly safe living space.
Quick Summary
| Key Point | Explanation |
|---|---|
| 1. Follow Expert Safety Protocols | Wait for the specified duration post-treatment to ensure safety before re-entering treated areas. |
| 2. Use Suitable Cleaning Materials | Choose recommended cleaning products to avoid interfering with pest treatments and ensure safety. |
| 3. Properly Dispose of Contaminated Waste | Safely bag and discard items exposed to chemicals to maintain a hygienic environment. |
| 4. Clean with Natural Solutions | Utilize natural cleaning agents to gently remove residual chemicals while caring for surfaces. |
| 5. Conduct a Thorough Inspection | Check for any signs of pests post-treatment to confirm the efficacy of the pest control measures. |
Table of Contents
- Step 1: Wait For Expert Clearance And Safety Checks
- Step 2: Gather Suitable Cleaning Materials And PPE
- Step 3: Remove And Dispose Of Contaminated Waste
- Step 4: Clean Surfaces With Safe Natural Solutions
- Step 5: Ventilate And Restore Treated Areas
- Step 6: Inspect For Any Remaining Signs Of Pests
Step 1: Wait for Expert Clearance and Safety Checks
After professional pest treatment, your safety depends on following precise clearance protocols. This step ensures you return to a clean and secure environment without risking exposure to treatment chemicals.
The first critical action is understanding the specific waiting period recommended by your pest control professional. According to guidance from UK pest control experts, you should typically wait between 2 to 4 hours while insecticides dry completely. Some treatments might require staying out of treated rooms for a more extended period of 5 to 7 days.
Professional pest controllers will provide specific instructions tailored to the exact treatment used in your property. These recommendations stem from detailed risk assessments designed to protect your health. As NHS guidance emphasises, contractors must conduct thorough evaluations and provide clear safety documentation before you re-enter treated spaces.
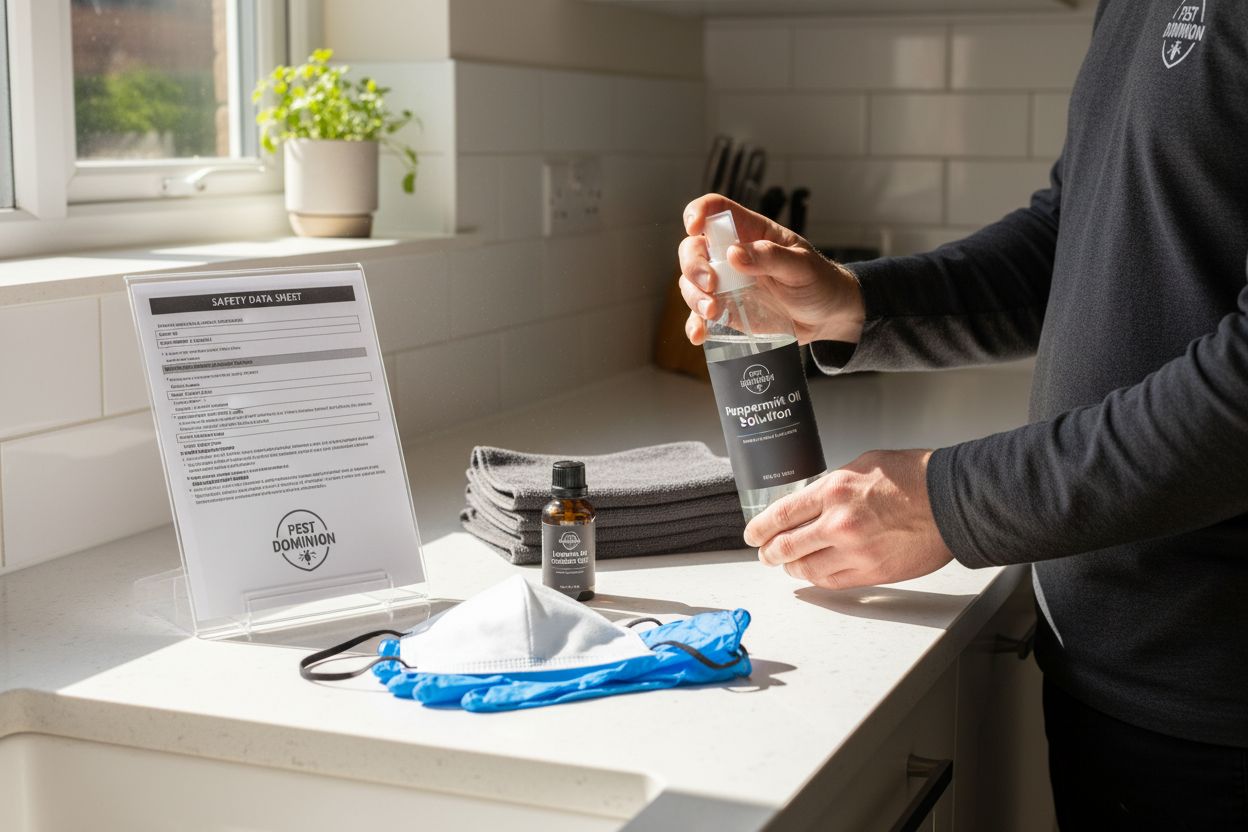
Pro Tip: Always request and keep the COSHH (Control of Substances Hazardous to Health) data sheet from your pest control provider. This document outlines specific safety instructions unique to your treatment.
Before resuming normal activities, confirm with your pest control technician that all warning notices have been removed and the area is completely safe. They will conduct final safety checks and provide verbal or written clearance indicating it is appropriate to re-enter and begin cleaning the treated areas.
Once you receive expert confirmation, you can confidently move forward to the next stage of post-treatment cleaning and home restoration. Your patience during this waiting period is crucial for ensuring a safe and effective pest management outcome.

Here’s a comparison of recommended waiting periods and safety actions after pest treatment:
| Treatment Type | Typical Waiting Period | Key Safety Actions |
|---|---|---|
| Light Insecticide | 2–4 hours | Wait for surfaces to dry Follow technician’s instructions |
| Intensive Treatment | 5–7 days | Vacate treated rooms Obtain written clearance |
| All Treatments | As advised | Request COSHH data sheet Remove warning notices |
Step 2: Gather Suitable Cleaning Materials and PPE
Now that you have received expert clearance, preparing the right cleaning materials and personal protective equipment becomes your next crucial step. Your goal is to clean effectively while protecting yourself from any residual treatment chemicals.
Start by consulting the COSHH data sheet provided by your pest control technician. NHS guidance emphasises the importance of understanding specific method statements that outline appropriate cleaning approaches. These documents will detail exactly which materials are safe to use on treated surfaces.
For personal protective equipment, gather disposable gloves, protective eyewear, and a face mask to minimise direct contact with treated areas. Choose cleaning materials that are compatible with the specific pest treatment used. This might include microfibre cloths, disposable paper towels, and gentle cleaning solutions recommended by your pest control professional.
Pro Tip: Remove any food items, pet bowls, and children’s toys from treated areas before beginning your cleaning process to prevent potential contamination.
According to Bug Wise Pest Control, it is crucial to follow your technician’s specific instructions about which items can be cleaned and how. Some surfaces might require special attention or limited contact to maintain the effectiveness of the pest treatment.
By carefully selecting your cleaning materials and protective gear, you are setting the stage for a safe and thorough post treatment clean up. You are now ready to move forward with confidence in your cleaning approach.
Step 3: Remove and Dispose of Contaminated Waste
Disposing of contaminated waste correctly is an essential step in your post pest treatment cleaning process. Your objective is to safely remove any materials that might have been exposed to treatment chemicals while maintaining a clean and hygienic environment.
NHS standards emphasise that proper waste management is crucial in preventing future pest issues. Begin by identifying items that were directly sprayed or exposed during the pest treatment. According to Bug Wise Pest Control, not all items will require disposal or extensive cleaning.
Wear your protective equipment while collecting contaminated materials. Use heavy duty garbage bags for disposal and seal them tightly to prevent any potential chemical leakage. Disposable items like used paper towels, protective gloves, and cloths should be carefully placed inside these bags.
Pro Tip: Double bag contaminated waste and label the outer bag to alert waste collectors about potential chemical residue.
Check with your local waste management authorities about specific disposal guidelines for chemically treated materials. Some areas have special protocols for disposing of pest control related waste to ensure environmental safety.
By methodically removing and disposing of contaminated waste, you are completing an important stage of your post treatment cleaning process. Your careful approach helps maintain a safe and healthy living environment.
Step 4: Clean Surfaces with Safe Natural Solutions
Clean surfaces naturally and safely is your next mission after pest treatment. Your goal is to remove any residual chemicals while protecting your home environment with gentle yet effective solutions.
According to Ideal Home, natural essential oils can be powerful cleaning agents. Create a gentle cleaning solution by mixing water with a few drops of peppermint, lavender, or citrus oils. These natural ingredients not only clean effectively but can also help deter future pest activities.
Mira Pest Services recommends waiting 24 to 48 hours before deep cleaning and advises using mild cleaning techniques. When wiping surfaces, use soft microfibre cloths and apply gentle circular motions. Pay special attention to edges and corners where treatment chemicals might have been concentrated.
Pro Tip: Always test your natural cleaning solution on a small hidden area first to ensure it does not damage or discolour the surface.
Focus on ventilating the space while cleaning. Open windows to allow fresh air circulation and help dissipate any lingering chemical odours. Your natural cleaning approach will help restore your space to a fresh clean state while maintaining the effectiveness of the original pest treatment.
With these surfaces now clean and safe, you are one step closer to a fully restored living environment.
Step 5: Ventilate and Restore Treated Areas
Restoring your living space to its normal state requires careful ventilation and strategic reintroduction of household items. Your primary objective is to create a safe environment that eliminates any remaining treatment chemicals while returning your home to comfortable daily use.
Bug Wise Pest Control recommends specific ventilation timelines depending on treatment intensity. For light treatments, allow 1 to 4 hours of drying time, while stronger treatments might require up to 24 hours before complete restoration.
Open all windows widely to create cross ventilation. According to guidance for homes with babies, aim for 15 to 30 minutes of thorough air exchange. Use fans to enhance air circulation and help disperse any residual treatment odours. This process helps remove potentially harmful chemical traces and refreshes your indoor environment.
Pro Tip: If possible, plan your ventilation during mild weather to make the process more comfortable and efficient.
Pest Control Experts emphasise the importance of cleaning high contact surfaces before fully restoring the area. Gradually reintroduce furniture, bedding, and personal items after ensuring surfaces are completely dry and aired.
By methodically ventilating and restoring your treated areas, you are completing the final stage of your post pest control cleaning process. Your home is now ready to return to normal daily life.
Step 6: Inspect for Any Remaining Signs of Pests
Your final step in the post pest treatment process is a thorough inspection to ensure the treatment has effectively eliminated the pest problem. This careful review helps confirm the success of the pest control intervention and identifies any potential need for follow up treatment.
NHS guidance emphasises the importance of routine monitoring after pest treatment. Begin your inspection by checking the areas most recently treated. Look for telltale signs like droppings, gnaw marks, nesting materials or unusual sounds that might indicate ongoing pest activity.
Concentrate on key areas such as kitchen spaces, storage rooms, and dark corners where pests typically hide. Pay special attention to edges of walls, behind appliances and in cupboard spaces. Use a flashlight to illuminate hard to see areas and check for any fresh signs of pest presence.
Pro Tip: Take photos during your inspection to document any findings and share with your pest control technician if needed.
As recommended by Western Pest, if you notice any continued signs of pest activity, contact your pest control professionals immediately. Quick reporting can prevent potential reinfestation and ensure comprehensive treatment.
By conducting this meticulous inspection, you are taking the final proactive step in maintaining a pest free environment. Your diligence helps protect your property and ensures long term pest management success.
Regain Control of Your Home with Professional Pest Solutions
Cleaning naturally after a pest treatment can feel overwhelming, especially when you are worried about lingering chemicals and the safety of your family or pets. At Pest Dominion Limited, we understand the stress of wanting your home to be clean and pest-free, without compromising health or comfort. Our approach addresses the same issues featured in our guide by offering expert advice, tailored aftercare, and lasting protection alongside each pest removal. You have already learned the importance of professional clearance, choosing safe cleaning materials, and methodical restoration.
Ready for total peace of mind? Choose a local team that prioritises safety, speed, and lasting results. See why hundreds trust us by visiting Pest Dominion Limited. If you need urgent aftercare or full-service support, contact our experts for a personalised plan based on your unique situation. Make the safe choice for your home today and restore comfort with the help of local pest professionals.
Frequently Asked Questions
How long should I wait before cleaning after pest treatment?
To ensure safety, wait for the recommended period provided by your pest control technician, typically between 2 to 7 days depending on the treatment. Once you receive expert clearance, you can start cleaning the treated areas.
What cleaning materials are safe to use after pest treatment?
Use gentle cleaning solutions and materials compatible with your pest treatment, such as microfibre cloths and mild cleaning solutions. Always consult the COSHH data sheet for specific cleaning recommendations related to your treatment.
How can I safely dispose of contaminated waste after pest treatment?
Collect any items that have been exposed to treatment chemicals and seal them in heavy-duty garbage bags for disposal. Consider double-bagging and labeling them to prevent potential chemical leakage.
What natural solutions can I use for cleaning after pest treatment?
Create a gentle cleaning solution by mixing water with natural essential oils like peppermint or lavender. Use this mixture on soft microfibre cloths to wipe down surfaces while ensuring the area remains well-ventilated.
How can I ensure proper ventilation after pest treatment?
Open windows and use fans to promote air circulation in treated areas for at least 1 to 4 hours, depending on the treatment intensity. This helps eliminate remaining chemical odors and refreshing your indoor environment.
What signs should I look for during the inspection after pest treatment?
Inspect areas where pests commonly hide for signs of ongoing activity, such as droppings or gnaw marks. Document any findings, and if you notice continued pest activity, contact your pest control technician immediately.